Getting Started
Here you will find both basic and advanced tutorials to help you get started using Piccolo2D. All tutorials provide examples in both Java and C#. This section assumes you have read Piccolo2D Patterns and have a basic understanding of the concepts presented there.
Building the Interface
This tutorial will show you how to build a Piccolo2D interface. It will cover how to use the default nodes, how to create new nodes through composition and how to create new nodes using inheritance.
Download the complete code sample in Java or
C#.
1. Setup
We need to create a window with a Piccolo2D canvas, so that we can add the interface components to the canvas.
-
First you will need to reference the appropriate packages/namespaces. Add the following lines to the top of your code file:
import edu.umd.cs.piccolo.*;
import edu.umd.cs.piccolo.event.*;
import edu.umd.cs.piccolo.nodes.*;
import edu.umd.cs.piccolo.util.*;
import edu.umd.cs.piccolox.*;
using UMD.HCIL.Piccolo;
using UMD.HCIL.Piccolo.Event;
using UMD.HCIL.Piccolo.Nodes;
using UMD.HCIL.Piccolo.Util;
using UMD.HCIL.PiccoloX;
The first line adds the base Piccolo2D types, such as
PNode. The second line includes the basic event types. The third line includes the default node types that Piccolo2D provides, all of which extendPNode. The fourth line includes several utility classes. And the last line includes various "extras," such asPFormin .NET andPFramein Java, which will be used below. -
Next we will extend the
PFormclass in .NET or thePFrameclass in Java. This is a convenience class that adds aPCanvasto a window. When you extend this class, you should NOT add your Piccolo2D code to the constructor. Instead, you should override theinitializemethod and add all of your Piccolo2D code there. See the FAQ for more details.public class InterfaceFrame extends PFrame { public void initialize() { //Add Piccolo2D code here. } }public class InterfaceForm : PForm { public override void Initialize() { //Add Piccolo2D code here. } }
2. Add a Drag Event Handler.
Now lets define some interaction for the nodes that we will add below.
-
By default, the pan and zoom event handlers are installed. We will remove the pan event handler and add a drag event handler instead so that the individual nodes can be dragged around. Add the following lines of code to the
initializemethod.// Remove the Default pan event handler and add a drag event handler // so that we can drag the nodes around individually. getCanvas().setPanEventHandler(null); getCanvas().addInputEventListener(new PDragEventHandler());
// Remove the default pan event handler and add a drag event handler
// so that we can drag the nodes around individually.
Canvas.PanEventHandler = null;
Canvas.AddInputEventListener(new PDragEventHandler());
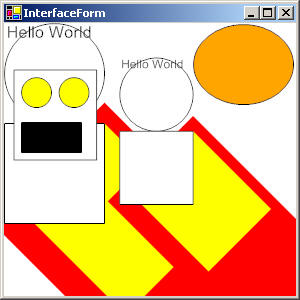
3. Add Some Default Nodes
Now we will add a few nodes to the interface. In addition to PNode, Piccolo2D comes with three basic types of nodes (PPath, PText and PImage), plus a few in the extras package. We will add each of the basic types below.
-
First we will use PNode directly. PNode is a concrete class and can be added to the scene. By default, a PNode will just fill its bounds with its paint. Add the following lines of code to the
initializemethod.// Create a node. PNode aNode = new PNode(); // A node will not be visible until its bounds and paint are set. aNode.setBounds(0, 0, 100, 80); aNode.setPaint(Color.RED); // A node needs to be a descendant of the root to be displayed. PLayer layer = getCanvas().getLayer(); layer.addChild(aNode); // A node can have child nodes added to it. PNode anotherNode = new PNode(); anotherNode.setBounds(0, 0, 100, 80); anotherNode.setPaint(Color.YELLOW); aNode.addChild(anotherNode); // The base bounds of a node are easy to change. Changing the bounds // of a node will not affect its children. aNode.setBounds(-10, -10, 200, 110); // Each node has a transform that can be used to modify the position, // scale or rotation of a node. Changing a node's transform, will // transform all of its children as well. aNode.translate(100, 100); aNode.scale(1.5f); aNode.rotate(45);// Create a node. PNode aNode = new PNode(); // A node will not be visible until its bounds and brush are set. aNode.SetBounds(0, 0, 100, 80); aNode.Brush = Brushes.Red; // A node needs to be a descendant of the root to be displayed. PLayer layer = Canvas.Layer; layer.AddChild(aNode); // A node can have child nodes added to it. PNode anotherNode = new PNode(); anotherNode.SetBounds(0, 0, 100, 80); anotherNode.Brush = Brushes.Yellow; aNode.AddChild(anotherNode); // The base bounds of a node are easy to change. Changing the bounds // of a node will not affect it's children. aNode.SetBounds(-10, -10, 200, 110); // Each node has a transform that can be used to modify the position, // scale or rotation of a node. Changing a node's transform, will // transform all of its children as well. aNode.TranslateBy(100, 100); aNode.ScaleBy(1.5f); aNode.RotateBy(45);This snippet illustrates how to create a node and add it to the scene. Typically you will add nodes to the main layer. It also shows that there are two ways to affect the position and size of a node, by changing its bounds or its transform. The first approach does not affect the node's children, while the second does. You can think of modifying a node's transform as defining a new coordinate system for that node and all of its children.
-
PNode itself is not very interesting. So, lets try some more advanced nodes. Add the following lines of code to the
initializemethod.// Add a couple of PPath nodes and a PText node. layer.addChild(PPath.createEllipse(0, 0, 100, 100)); layer.addChild(PPath.createRectangle(0, 100, 100, 100)); layer.addChild(new PText("Hello World")); // Here we create a PImage node that displays a thumbnail image // of the root node. Then we add the new PImage to the main layer. PImage image = new PImage(layer.toImage(300, 300, null)); layer.addChild(image);// Add a couple of PPath nodes and a PText node. layer.AddChild(PPath.CreateEllipse(0, 0, 100, 100)); layer.AddChild(PPath.CreateRectangle(0, 100, 100, 100)); layer.AddChild(new PText("Hello World")); // Here we create a PImage node that displays a thumbnail image // of the root node. Then we add the new PImage to the main layer. PImage image = new PImage(layer.ToImage(300, 300)); layer.AddChild(image);In the first two lines, we add a couple of path nodes.
PPathrepresents a general path. You can create arbitrary paths by adding line segments and arcs or you can use one of the staticCreateXXXmethods to create a common shape. ThePenproperty in .NET andthe setStroke()andsetStrokePaint()methods in java define how the edge of a path is drawn, while theBrushproperty in .NET and thesetPaint()method in Java will define how the path is filled.Next, we add a text node. PText is a multi-line text node that will wrap its text based on the width of the node's bounds.
Finally, we add an image node. PImage wraps an image so that it can be added to the Piccolo2D hierarchy. Above, we take advantage of the
PNode.ToImage()method, which can be used to get a thumbnail of any node.
4. Create a New Node using Composition
The real power of Piccolo2D is the ability to make new kinds of interface components. There are various way to make new types of nodes. Here we will examine how to create new nodes by combining several pre-existing nodes together.
-
We will create a face node by adding the eyes and mouth as the children of another node. Add the following lines of code to the
initializemethod.PNode myCompositeFace = PPath.createRectangle(0, 0, 100, 80); // Create parts for the face. PNode eye1 = PPath.createEllipse(0, 0, 20, 20); eye1.setPaint(Color.YELLOW); PNode eye2 = (PNode) eye1.clone(); PNode mouth = PPath.createRectangle(0, 0, 40, 20); mouth.setPaint(Color.BLACK); // Add the face parts. myCompositeFace.addChild(eye1); myCompositeFace.addChild(eye2); myCompositeFace.addChild(mouth); // Don't want anyone grabbing out our eye's. myCompositeFace.setChildrenPickable(false); // Position the face parts. eye2.translate(25, 0); mouth.translate(0, 30); // Set the face bounds so that it neatly contains the face parts. PBounds b = myCompositeFace.getUnionOfChildrenBounds(null); b.inset(-5, -5); myCompositeFace.setBounds(b); // Opps its to small, so scale it up. myCompositeFace.scale(1.5); layer.addChild(myCompositeFace);PNode myCompositeFace = PPath.CreateRectangle(0, 0, 100, 80); // Create parts for the face. PNode eye1 = PPath.CreateEllipse(0, 0, 20, 20); eye1.Brush = Brushes.Yellow; PNode eye2 = (PNode) eye1.Clone(); PNode mouth = PPath.CreateRectangle(0, 0, 40, 20); mouth.Brush = Brushes.Black; // Add the face parts myCompositeFace.AddChild(eye1); myCompositeFace.AddChild(eye2); myCompositeFace.AddChild(mouth); // Don't want anyone grabbing out our eye's. myCompositeFace.ChildrenPickable = false; // Position the face parts. eye2.TranslateBy(25, 0); mouth.TranslateBy(0, 30); // Set the face bounds so that it neatly contains the face parts. RectangleF b = myCompositeFace.UnionOfChildrenBounds; b.Inflate(5, 5); myCompositeFace.Bounds = b; // Opps its too small, so scale it up. myCompositeFace.ScaleBy(1.5f); layer.AddChild(myCompositeFace);This works because of the hierarchical nature of Piccolo2D. However, by default any node is pickable. "Picking" refers to the process that determines which node is under the mouse cursor. Events will be dispatched to the picked node and passed to each ancestor that also intersects that point (see the Defining User Interaction tutorial). Typically event handlers will modify the picked node in some way. For example the drag event handler, will move the picked node, which means that the children can be dragged around without moving the parent. In this case, we only want to be able to drag the face as whole. So we make the face's children not pickable. This means if you click on an eye, the face will be picked instead. The drag event handler moves the picked node by modifying its transform so the eyes and the mouth will also be moved.
5. Create a New Node using Inheritance
Of course, the ultimate creative control comes from extending the existing node types to create new kinds of nodes. Here we will use inheritance to build a new kind of node.
-
We will create a new node that will draw itself as an ellipse by default and as a rectangle when the mouse is pressed over the node. We will implement this class by extending PPath so we don't have to create the ellipse code from scratch. For an example of how you could create an ellipse node from scratch see the Creating Nodes Pattern. Add the following internal class beneath the
initializemethod.class ToggleShape extends PPath { private boolean isPressed = false; public ToggleShape() { setPathToEllipse(0, 0, 100, 80); addInputEventListener(new PBasicInputEventHandler() { public void mousePressed(PInputEvent event) { super.mousePressed(event); isPressed = true; repaint(); } public void mouseReleased(PInputEvent event) { super.mouseReleased(event); isPressed = false; repaint(); } }); } protected void paint(PPaintContext paintContext) { if (isPressed) { Graphics2D g2 = paintContext.getGraphics(); g2.setPaint(getPaint()); g2.fill(getBoundsReference()); } else { super.paint(paintContext); } } }class ToggleShape : PPath { private bool isPressed = false; public ToggleShape() { this.AddEllipse(0, 0, 100, 80); } public override void OnMouseDown(PInputEventArgs e) { base.OnMouseDown (e); isPressed = true; InvalidatePaint(); } public override void OnMouseUp(PInputEventArgs e) { base.OnMouseUp (e); isPressed = false; InvalidatePaint(); } protected override void Paint(PPaintContext paintContext) { if (isPressed) { Graphics g = paintContext.Graphics; g.FillRectangle(this.Brush, this.Bounds); } else { base.Paint(paintContext); } } }In the constructor we use the
PPathto create the ellipse. We store the isPressed field to indicate whether or not the mouse is currently down over the node. Notice that the on mouse up and on mouse down methods set the value and then callInvalidatePaint(). This method notifies the framework that the node needs to be repainted. Piccolo2D will then invalidate the child paint of all the ancestors of this node. Later the screen damage will be collected for all the nodes with invalid paint and eventually thePaint()method of those nodes will get called. Notice that we override thePaint()method to modify how the node will be drawn when it is repainted. When fIsPressed is true, we will fill the bounds of the node. Otherwise, we will just use the base implementation, which will only fill the ellipse.Finally, we also use event handlers to set isPressed to true when the mouse is down over the node, and back to false, when the mouse is released. For more about events, see the Defining User Interaction tutorial.
-
Now that we've created the new type, we have to actually add the node to the interface. Add the following lines of code to the
initializemethod.ToggleShape ts = new ToggleShape(); ts.setPaint(Color.ORANGE); layer.addChild(ts);
ToggleShape ts = new ToggleShape();
ts.Brush = Brushes.Orange;
layer.AddChild(ts);